ZSA Moonlander Keyboard 5 days in - A review
This article will serve two purposes, for one, it will allow me to share my thoughts around this amazing keyboard, and secondly, it'll give me some much needed typing practice on the Moonlander. I think the best way to lay out this article is as follows:
- what is the Moonlander?
- my experience thus far and what separates it (this is hilarious if you think about it) from other ergo boards?
- portability
- wait...it costs what?? Is it worth it?
- final thoughts and wrap up
What is the Moonlander Mark I?
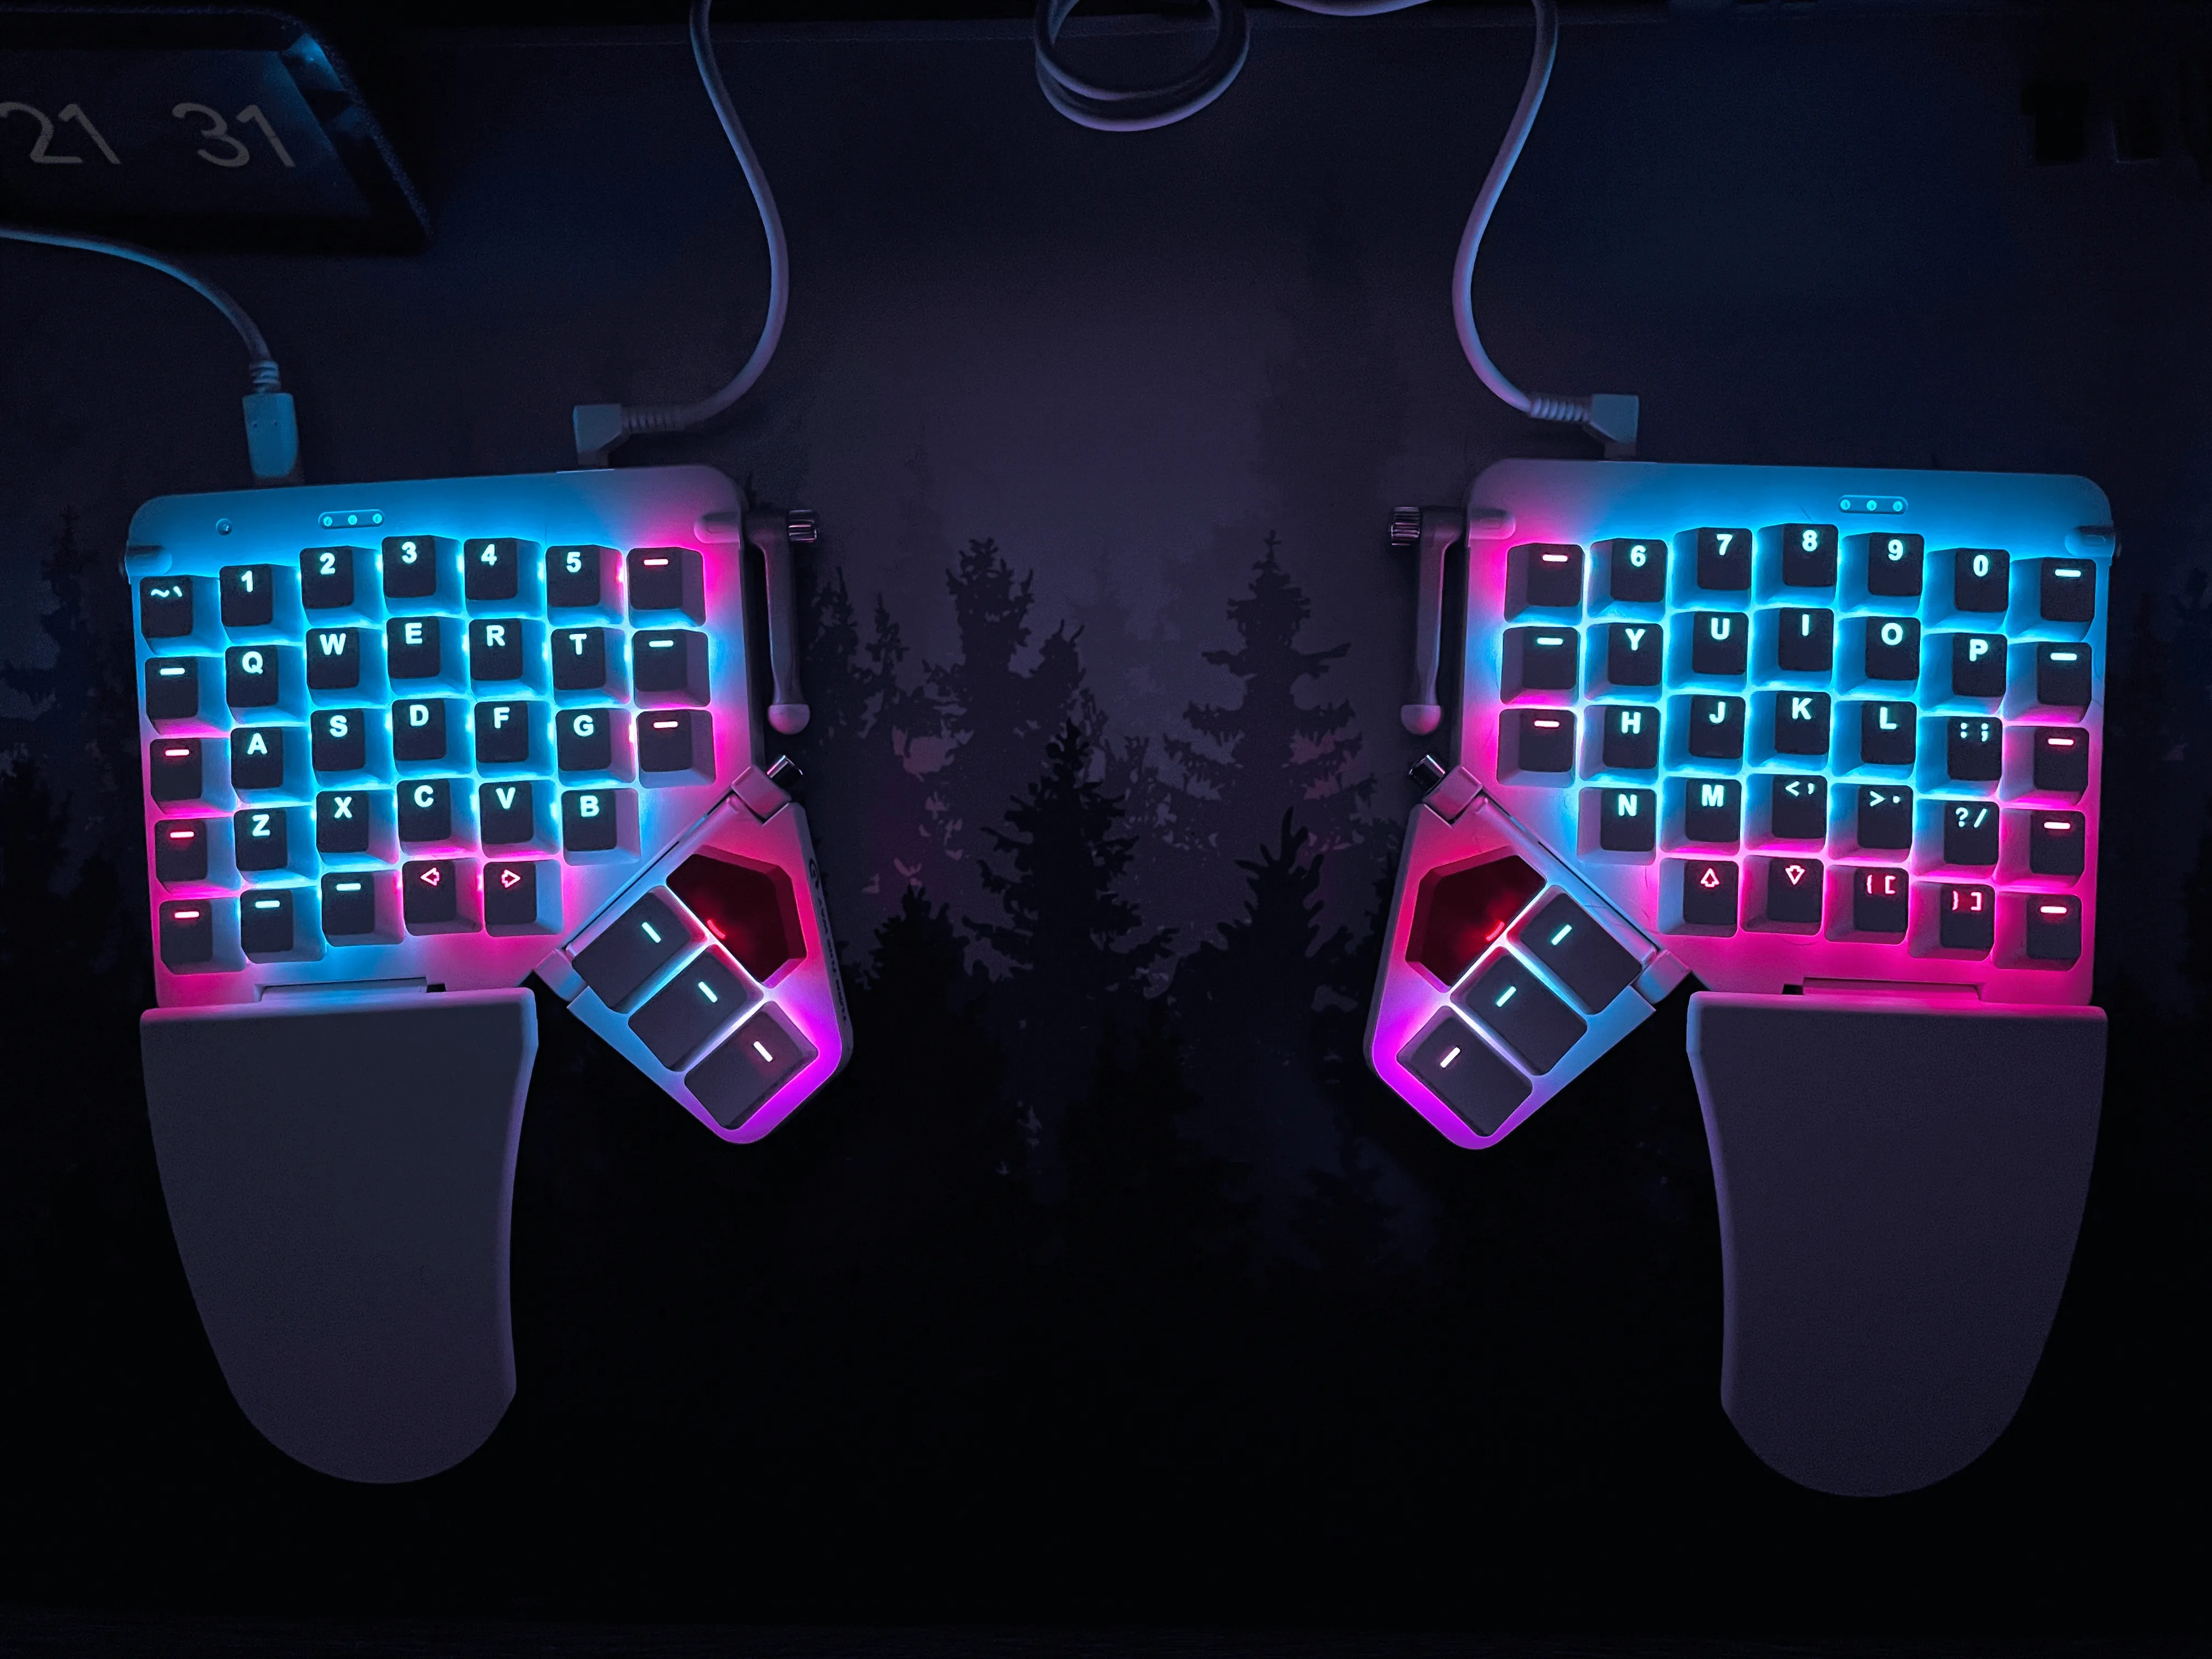
So what is the Moonlander Mark I? Well, it's a keyboard obviously! Section One complete! Well hold on - there's definitely more to mention here. The Moonlander Mark I is an ergonomically split keyboard design from ZSA (the same folks behind the Ergodox and the Planck). It has an extremely unique layout and look given it's "Wing" wrist rests and thumb cluster. It has what is referred to as a "columnar" layout to the keys. This simply means they are laid out in vertical columns versus the staggered layout of a standard QWERTY style keyboard. You're asking "what do you mean staggered?". So think of your "F" key on a standard keyboard, this is the key that would typically sit under your left pointer finger in the "home" position. Now I want you to imagaine that you need to use the "V" key. You'd move your left pointer finger off the "F" key, down and, importantly, to the right. It's not a simple vertical movement is it? There's a bit of an awkward stretch there. Only you don't perceive this as awkward because most of us have been using this style keyboard layout since grade school. However, I promise that your hand and your wrist still perceive it as awkward - the proof of this can be felt after a long day of keyboard activity. You feel a strain in your fingers and in your wrists. There's an unnatural flexing that happens on a standard keyboard that can lead to awful things like carpal tunnel syndrome. The columnar layout seeks to reduce the flexing and unnatural movements we make while typing by placing almost all of the most frequently used keys just one true vertical step up or down from where our hands are at rest on the keyboard. On the Moonlander, the "V" key is not down and to the right from the "F" key. It's just down. That's it. A simple natural down stroke. This is shockingly comfortable. It's also shockingly hard teaching your fingers to move in this way after what might be decades on staggered layout keyboards. As the makers of the Moonlander rightly claim on their site, the Moonlander very quickly exposes the "bad habits" you've developed over the years.
Consider that every time you need to move your hands from the "home" row that, given a different layout, that movement could be rendered unnecessary.
You quickly discover just how much unnatural movement used to be required to type out just basic sentences. No wonder carpal tunnel is so common. Let's quickly address the split design before moving on the next section. Why is a split design potentially advantageous? Again, I'd like you think of how you'd sit at a regular keyboard. Your hands would be placed tightly together as they sit on or above the keyboard. I want you to emulate the position as you're reading this. How do your arms feel? Your shoulders? Are they tense? There's a good chance that they are. Now I want you to spread your hands shoulder width apart and just set them there. Do you feel it? With your hands spread apart your posture should naturally improve and you should feel more relaxed and less cramped. This is the real power of a split design. Don't get me wrong - it is very weird at first and not for everyone, but I reckon that's more an issue of familiarity versus actual weirdness.
I'm 5 days in - so how has my experience been with the Moonlander thus far?
For this section I'll try to adhere to the following points:
- what came in the box?
- keyboard quality?
- Oryx and other included tools
- layout notes and personal typing experience
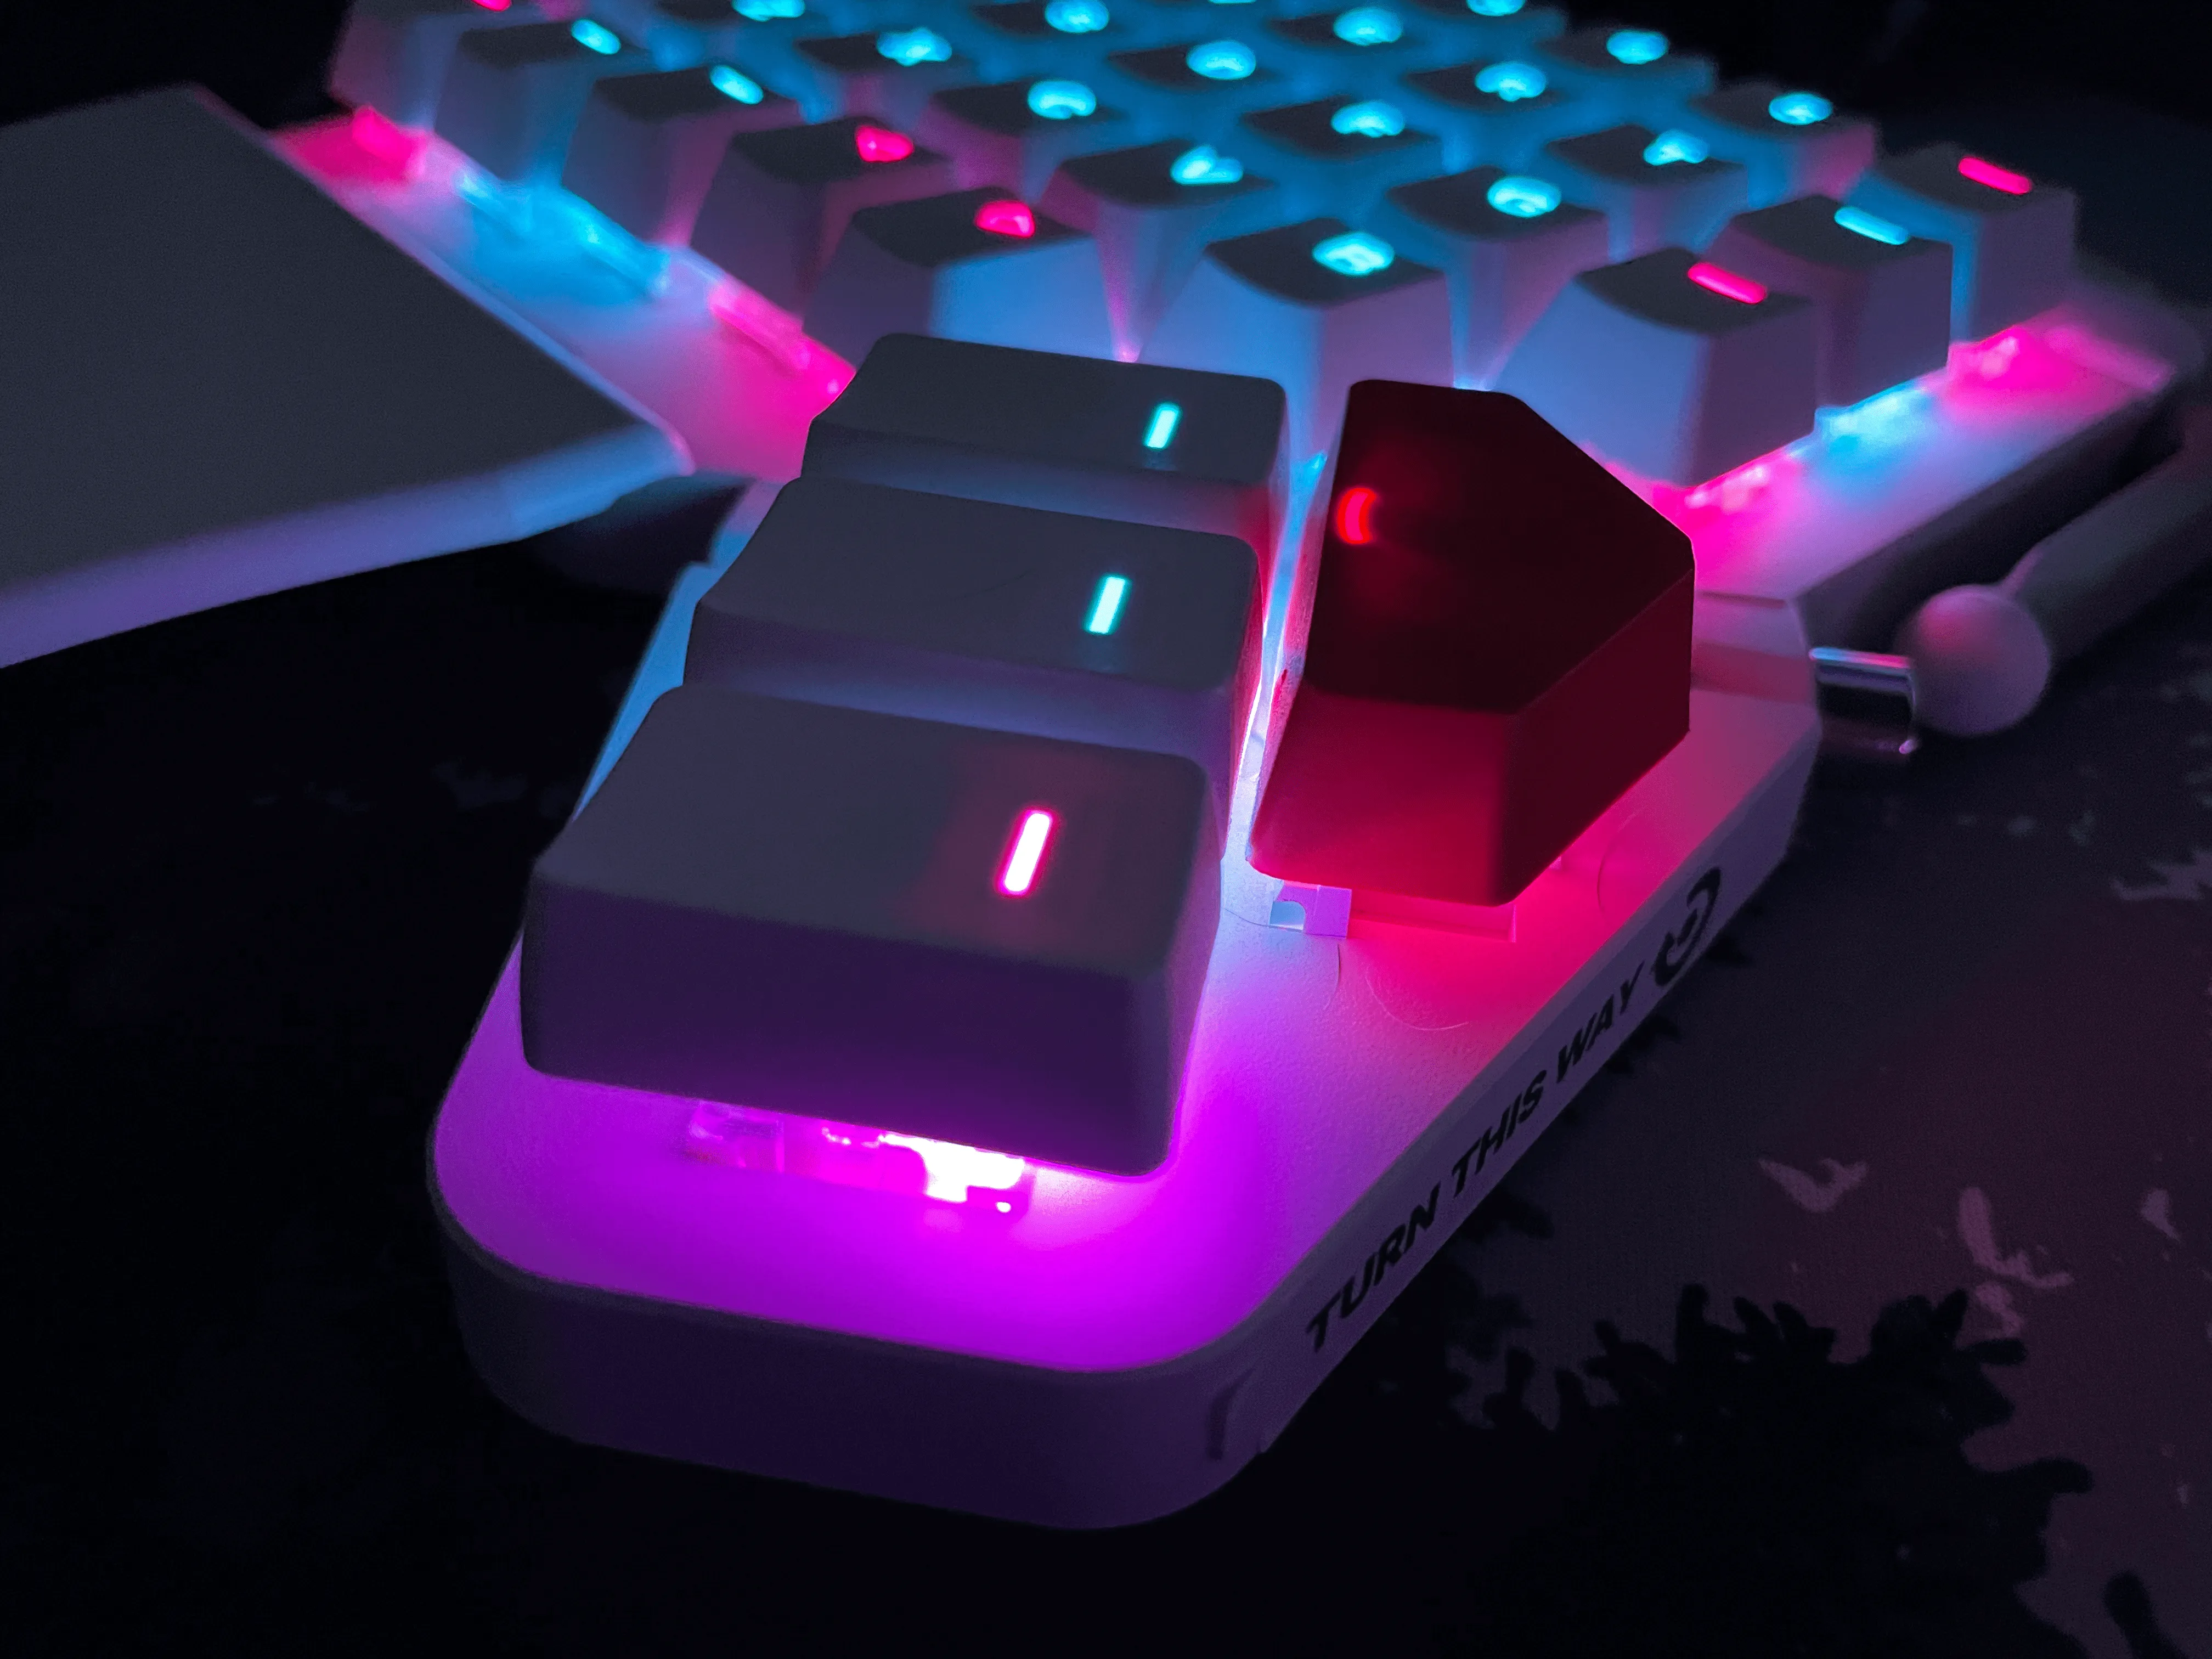
The Moonlander ships with both keyboard halves (hey you never know these days!), both "Wing" wrist supports, a usb-c to usb-c main connection cable, a usb-c to usb-a adapter for the main cable, a 3.5mm TRRS cable (to connect the two board halves), a foldable carrying case, a combination cap puller/switch puller tool, a hex key for tilt arm and thumb cluster adjustments, and a package containing an extra blank keycap, an "F" cap with no notch, and finally a "J" cap with no notch. Bear in mind that each keyboard half also comes with the thumb cluster attached, as well as an adjustable arm for tilting/tenting. These are attached to the board with hex screws that can be manipulated via the included hex wrench. All in all, its a pretty small little package. Like a miniature cake box - with a delicious mech inside.
So let's talk quality - how does the Moonlander feel? The board itself is very thin, which adds to it's portability, more on this in a bit; that being said, the whole unit feels very sturdy and is very well made. At time of purchase, you are able to select your desired switch. You are able to select from a pretty wide range of clicky, tactile, and linear switches. For my board, I chose Kailh Box Black switches, for no other reason other than I had never tried them before. The board comes fully assembled with your switches already installed. The switches are not my favorite, but that's not a quality issue, they were well lubed and each switch was installed correctly as you'd hope. The board base, as well as the "Wing" wrist rests are plastic, but feel very durable. The connection point for the wrist rests are wide and well made which gives me confidence that they should last quite a while.
A quick note on the "Wings" - they can be completely removed without any tools should you not want to use them, or would rather use your wrist rest of choice.
The adjustable thumb cluster moves easily and freely when not tightened down, and doesn't move at all when locked into your desired position - which can be positioned up for smaller hands, and down for bigger mitts. The keycaps are slightly textured and feel great to me. Upon removing them for switch changes I found them to be quite thick and they are high quality double-shot PBT just as the Moonlander site mentions. I got the printed caps as I didn't want to make the learning curve harder than it had to be, however, should you choose to get the blank caps (it's an option) the blank keys are sculpted to make sure each row has a unique feel under your fingers. The included cords are thick and well made and come with velcro binding which is always appreciated for cable management. Lastly, the tilting/tenting arms are made from what appears to be either aluminum or straight up steel. Either way - they are extremely well made and can be positioned at any angle for maximum customization.
The Moonlander feels both sturdy and satisfying while also being incredibly thin. It is simultaneously impressive and slight.
These are just the physical aspects of the board - but the Moonlander comes with a whole bunch more than just the physical goodies. Coupled with the Moonlander is a tool called Oryx. Oryx is like a one stop shop for customizing your board (in every possible way - from lighting to keymapping to layers) as well as a training dojo for mastering your Moonlander with typing exercises, and finally, a community board where fellow enthusiasts post and share their most loved layouts. To say that Oryx is a game changer would be such a massive understatement. First of all, you don't download Oryx, you don't install it on your laptop or desktop. You just create an account and begin customizing your keyboard of choice (Ergodox and Planck also support this). Once you've created a layout, you can simply download the .bin file and flash it to your Moonlander. FLASH IT TO THE BOARD! You realize what this means right? It means that your layouts, color configurations, and customized layers, are all kept ON THE BOARD! Not on some program that needs to be installed and run ON EVERY DEVICE YOU'D EVER HOOK YOUR MOONLANDER UP TO! This means that no matter where, or how, or on what machine you use your board, your custom settings are right there waiting for you with no drivers or software to preinstall. OMG. I know. I'm shaking too.
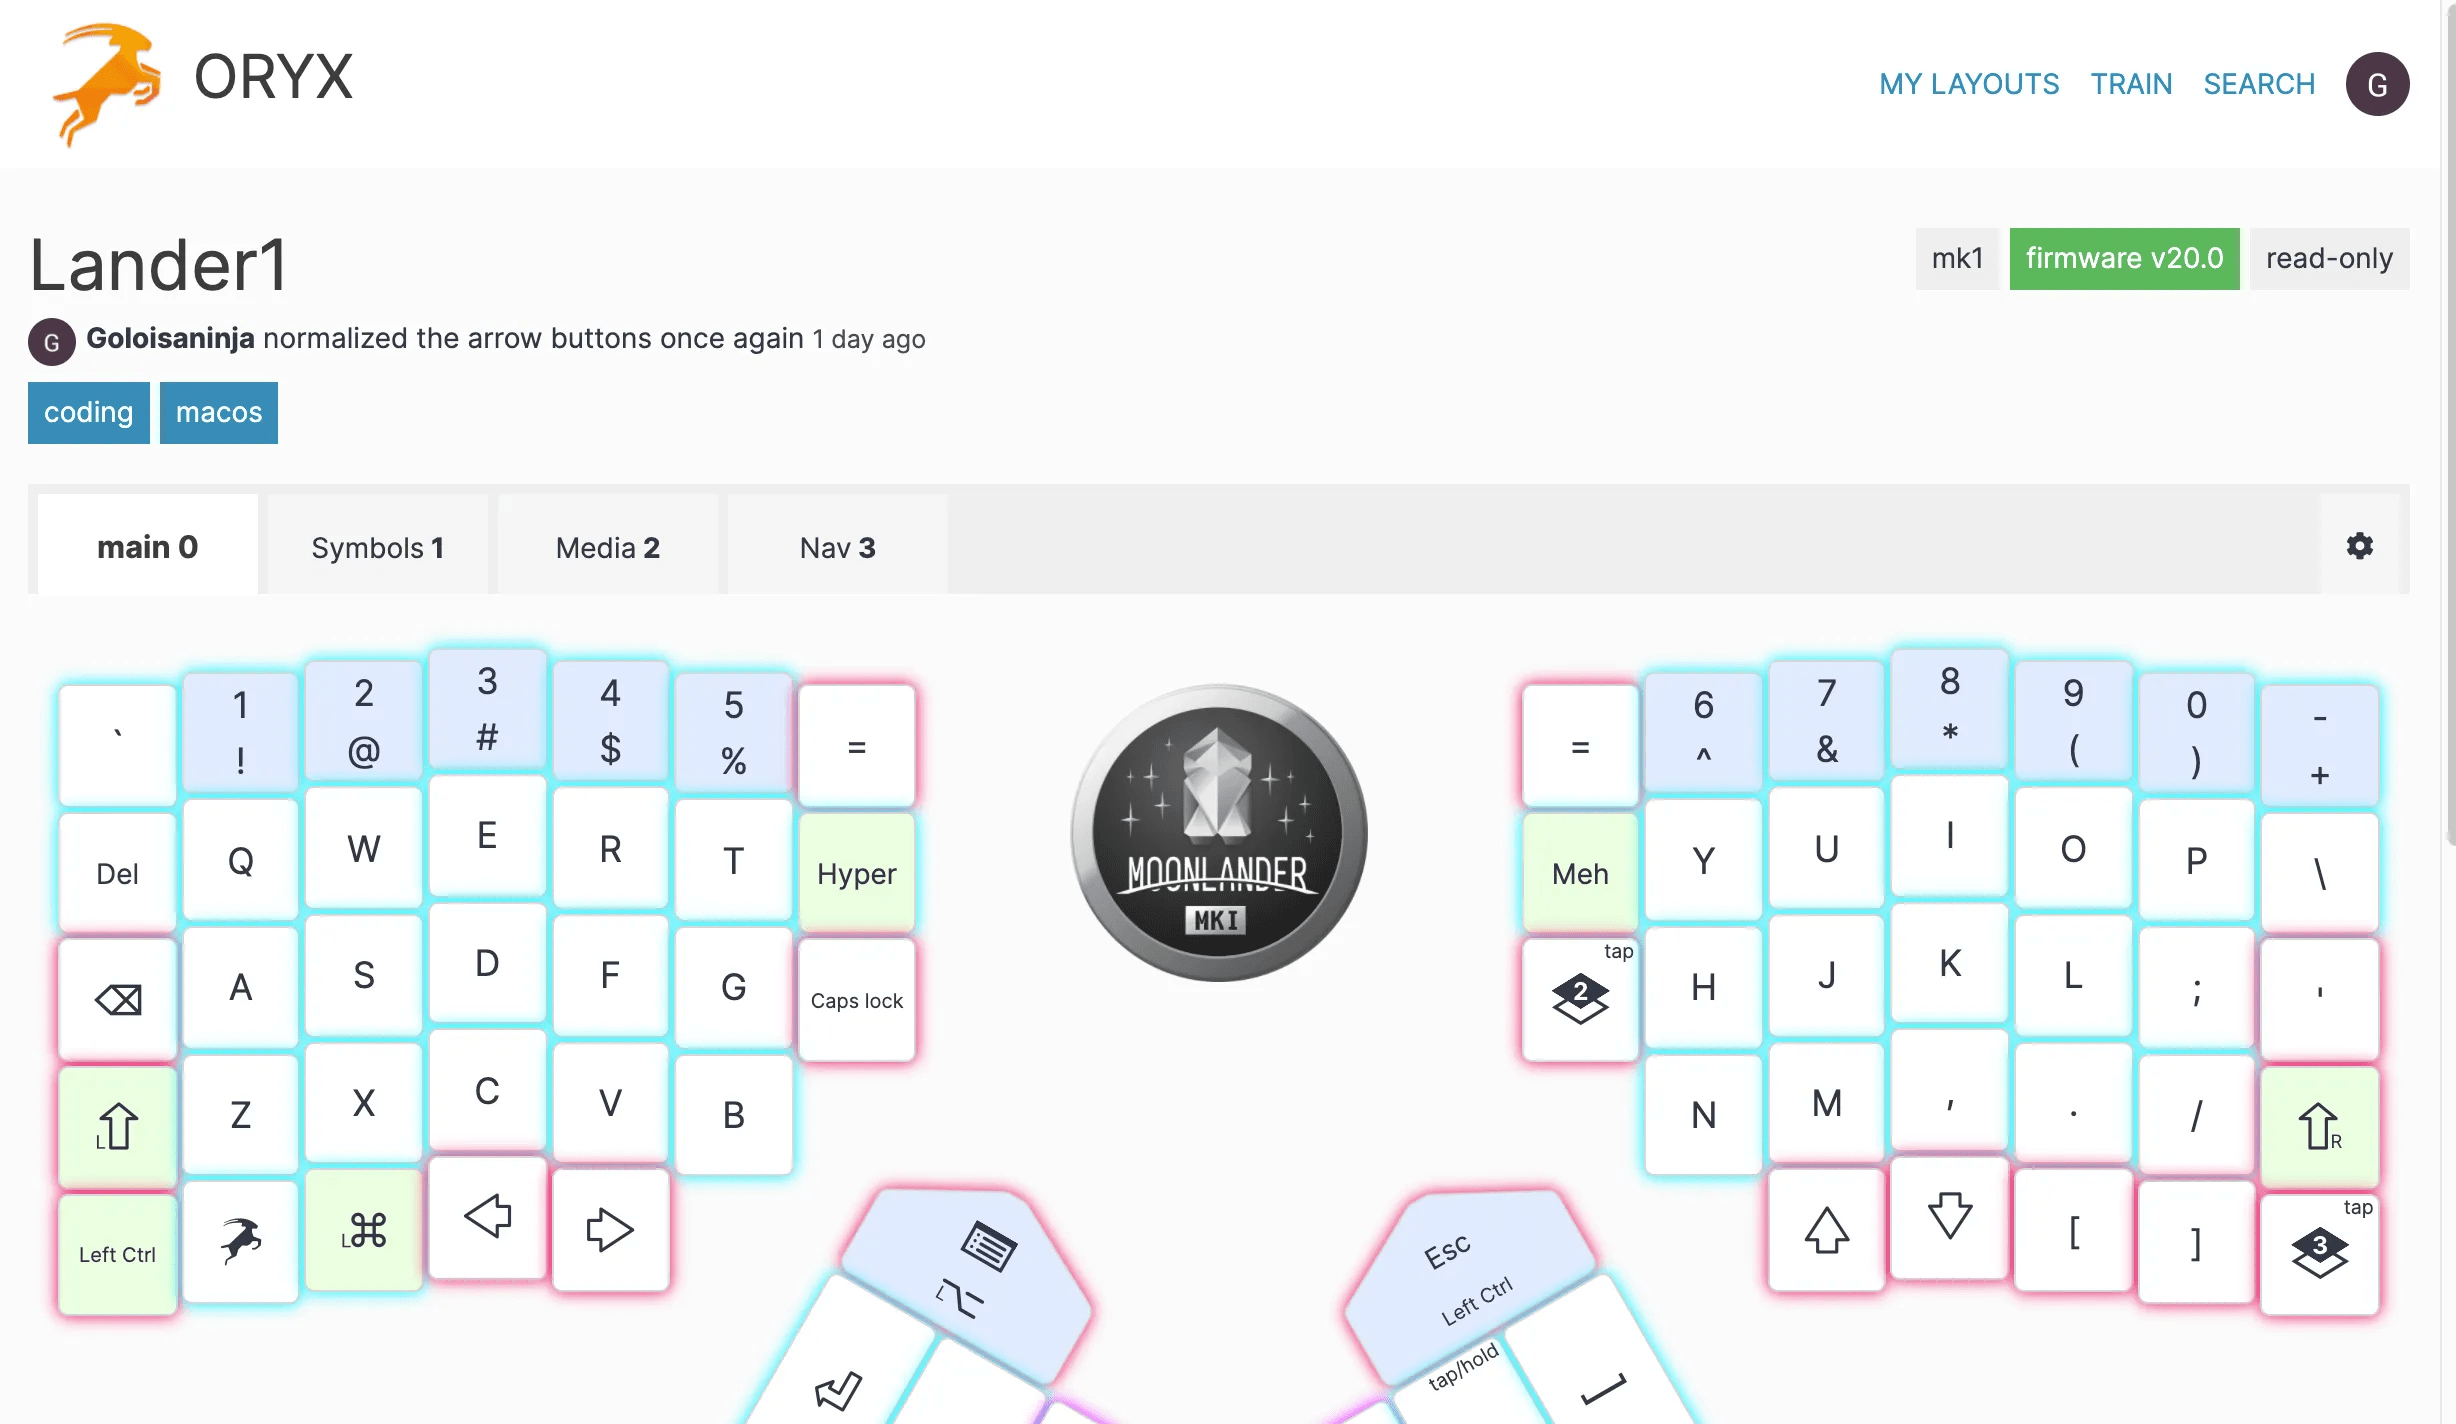
You can easily start to imagine more possibilites of how Oryx revolutionizes your life when you realise that you can literally remap ANY key of your Moonlander to be WHATEVER you want it to be with a few clicks of your mouse. I'm not kidding here - you can literally remap the entire board. If you want "A" to be "C", well my friend, you go nuts. Your imagination is your only limitation. And with Oryx's graphical interface, it's all just so easy. Flash it and your new layout is ready to go. Now let's talk about Oryx's training tools. Using Chrome or any browser that supports connection with USB (Brave works as well), you can connect your Moonlander and begin training exercises like typing out book excerpts or even working with various coding languages like Ruby, JavaScript, or Python. The training will rate your accuracy and WPM if you hit above 95% accuracy. It also gives you a github repo commit style calendar to show your training intensity over time. Can we talk heatmaps? Oryx allows you to start a heatmap to run during your day, so that you can see which parts of the board are really important to you and where you should dedicate a lot of your customization efforts. If it seems like I'm gushing, you're right, I'm gushing. Oryx is freaking amazing and I've only just scraped the surface of it. Providing this kind of tooling and support puts ZSA on the top of a very short list of mech makers in my book.
Oryx isn't just a game changer - it's a life changer. Oryx brings your imagination, and more importantly, your dream keyboard experience to life and shows you just how inflexible every keyboard you've ever owned has been.
A quick note on my layout and personal experience thus far. As I mentioned early, Moonlander is columnar, not staggered. You may have also noticed that Moonlander has far fewer keys than a typical 108 key full size board. So what does all this mean? Well, for one, it means I'm constantly hitting the wrong keys. If something I'm typing contains a "C" or a "V" or a "Z", look out. I'm going to mistype it. This isn't because the Moonlander is bad, it's because typing on traditional staggered keyboards creates a pretty unhealhy lateral stretch that is hard to rewire in my brain. It's why the Oryx tool is so essential. It helps me to work on rewiring the bad muscle memeory and replace it with better typing practices. Five days in, I'd say my experience has been great. Has it been frustrating at times? Yes. Has my WPM plummeted to Rock Bottom from Bikini Bottom? Also, yes. But overwhelmingly, I can see, and more importantly, I can feel, the potential of this board. It's so, darn, comfy. My arms and shoulders are no longer tense while coding and I no longer feel cramped and hunched over during work. My typing stance is so much more natural thanks to the split design. And my custom layout has really reduced the amount of movement necessary to actually "type" something. I'll give you a few quick examples. You know that pesky backspace key on a traditional keyboard? You know the one. It sits way up at the top of the board, just below the function keys. You know how you'd typically have to move your right hand off the home row to go and smack it when you made a mistake? What if I told you (Morpheus voice) that my backspace key is just to the left of the "A" button right on the home row? Crazy? Yes. Crazy comfortable! But what about Caps Lock you ask? Don't worry, I found Caps Lock a very safe home - it's just to the right of my "G" key on layer zero. I use backspace far more than caps lock (especially now learning a new board style) and so having backspace within reach and not needing any hand jumps is a massive improvement. My number keys? They are still number keys - however, one big change is that to access the symbols "beneath" each number no longer requires a "shift" keypress. If I need an exclamation point, I simply press and hold the number 1 and I get it. If I need a hash, I press and hold 3. It sounds subtle, but not having to hit shift for those symbols is ridiculously nice. Setting up my brackets for coding was a bit trickier. I could get my parentheses as I always had, but I've got a board I can remap, so why should I have to reach for keys I use constantly! I decided to make a symbol layer that I could access with a quick layer change initiated with a thumb cluster "piano" key press or toggle. I can simply activate the layer, and all my brackets are now directly under my middle and pointer fingers on the left home row. This layout has worked well for me so far to increase my coding speed and reduce the movements needed to access certain essential coding symbols like brackets, equality operators, and more.
Moonlander Review Part 2 Coming Soon!
I was going to try and fit this review into one blog post - but this post has already gotten too long. Bounce rate on this review is going to be through the roof already! I will finish the final review sections:
- portability
- costs, was it worth is?
- final thoughts
in a subsequent blog article. Be sure to check back in a few days for the follow up article where I'll address the above points and will give my final thoughts on the Moonlander board. Should you get it? Is it worth it? In what cases should you not get it? All this and more, coming up in the final Moonlander review article! Thank you for reading!